


This is a blog post I promised to do quite a while ago so I’m really happy to finally be sharing it with you… better late than never! 😄 It’s all about my daughter’s JW Anderson Harry Styles inspired cardigan which she made last year and how she crocheted it, so that many of you might be able to make one too! Scroll down for our how to guide…

I’ve been spurred on by the fact that I’m heading to a Harry Styles concert with my daughter later this week. 🎶 It will probably be too warm for her to wear the cardigan although she’ll decide on the day! 🙂 As I sit here writing this blog post I have some Harry Styles music playing in the background and it’s really getting me in the mood… 😄🎶
My daughter Bronwyn is a big fan of Harry Styles… and many of you will know about the knitted JW Anderson cardigan he famously wore back in 2020 which has quickly become an iconic fashion garment! The original cardigan he wore is now on display in the V&A Museum London.

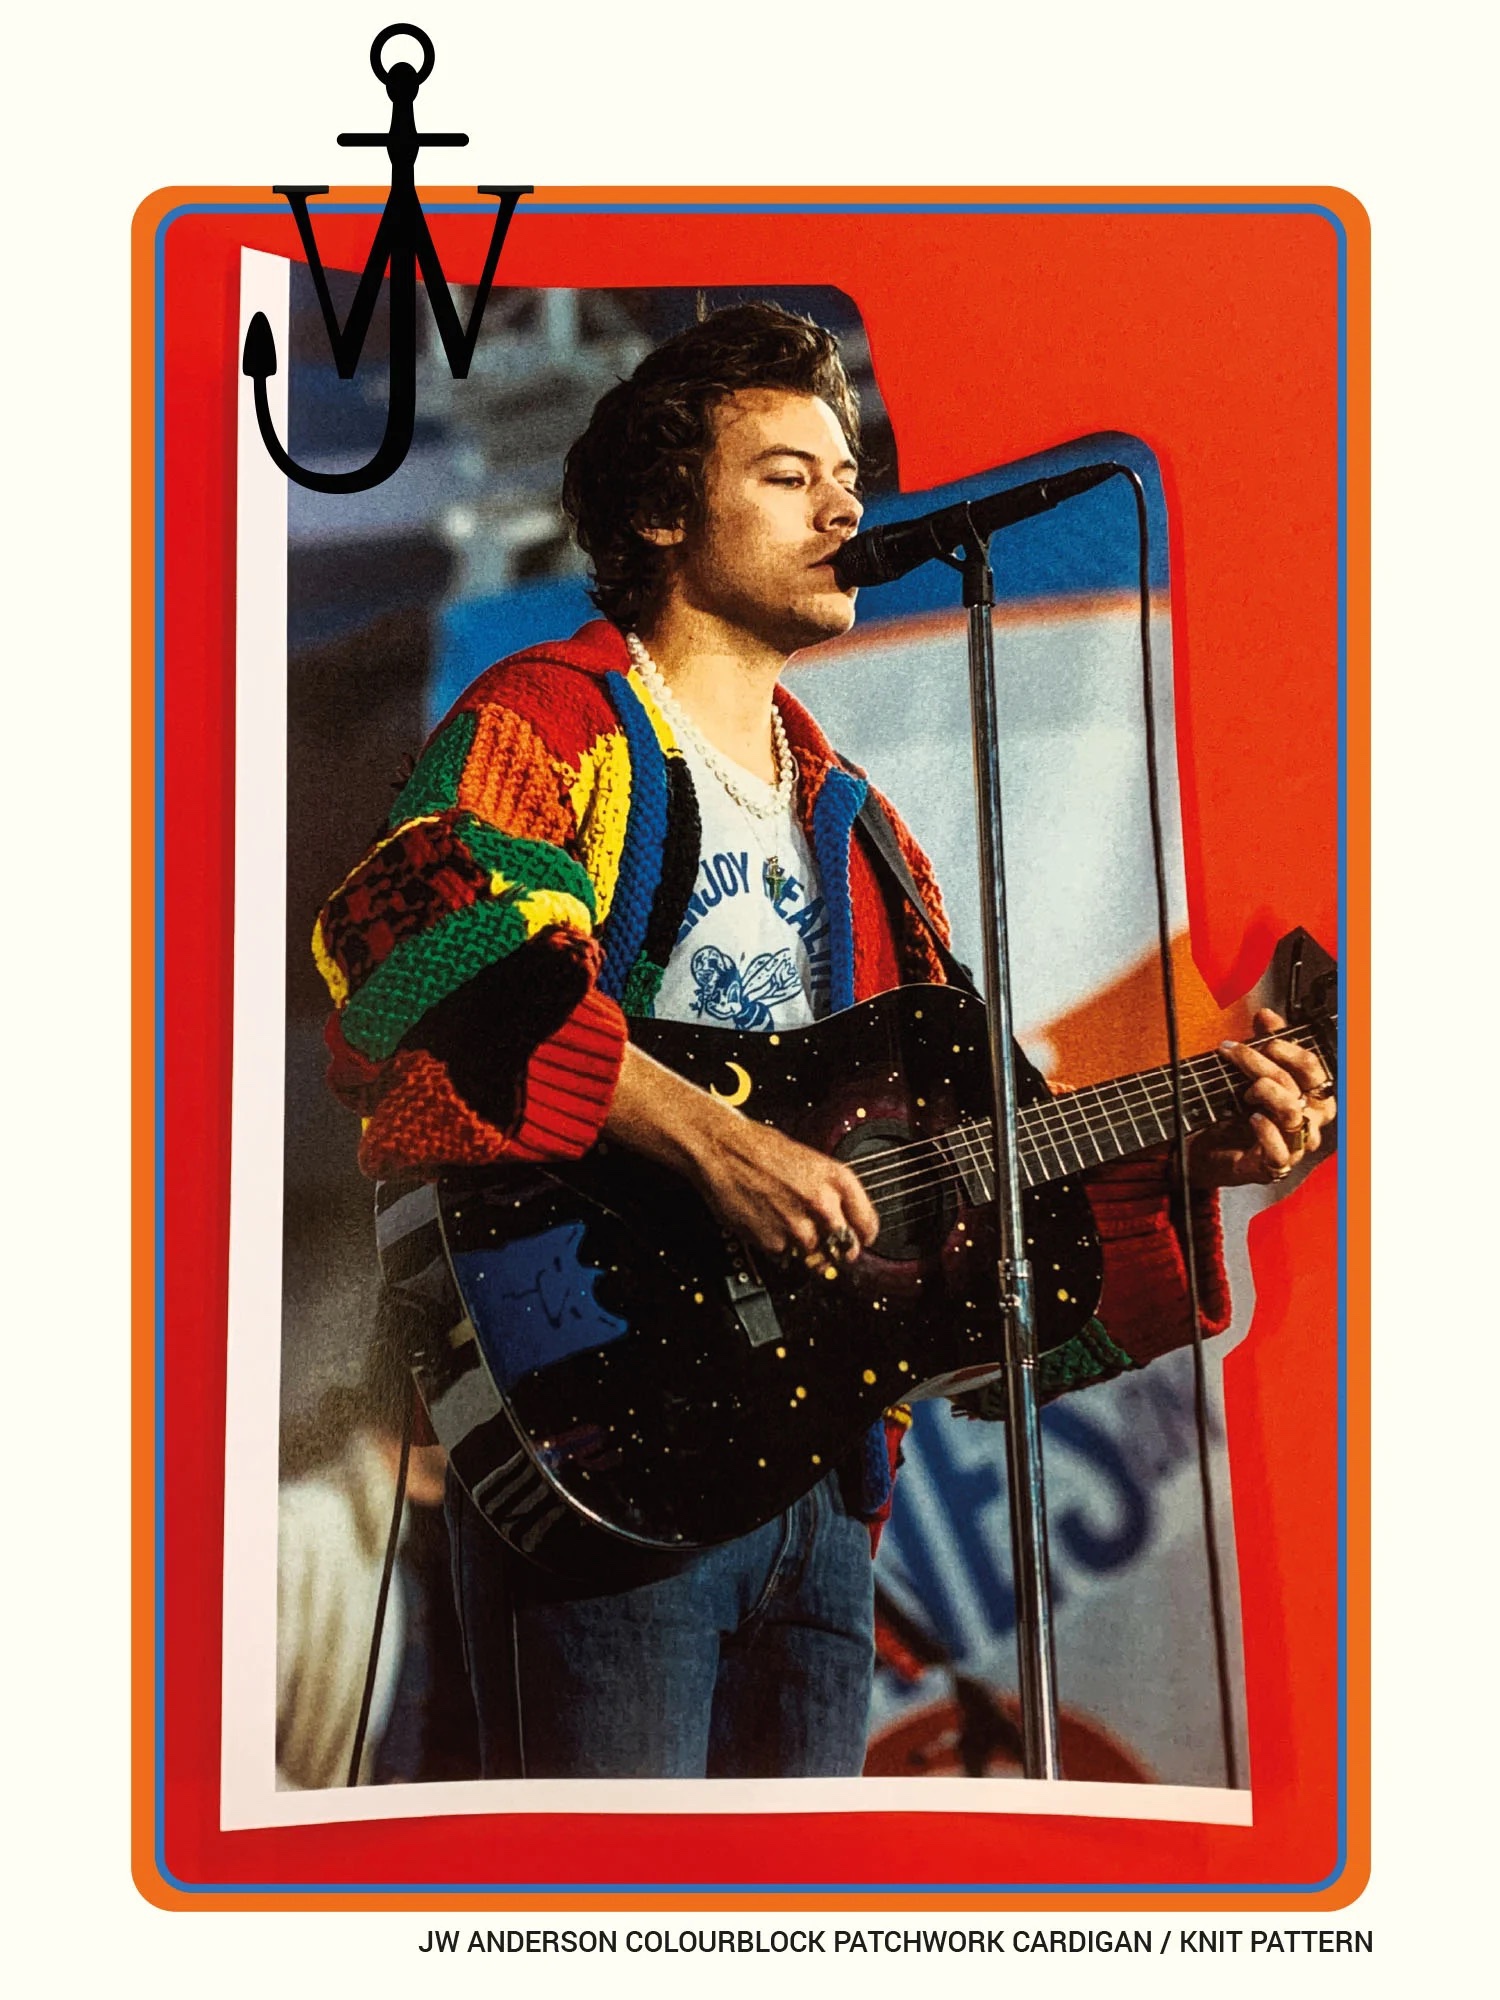

At the time it inspired many people to make their own versions – both knitted and crocheted – and lots of various patterns were shared online. JW Anderson embraced this and in response to the social media frenzy around the original design he actually commissioned knitwear and crochet designer Ruth Herring @confessions_of_a_yarnaholic to write a pattern for a hand knit version which he now generously offers for free on the JW Anderson website. You can find that here:
https://www.jwanderson.com/gb/cardigan-pattern
Here’s what he wrote…

My daughter wanted to make her own version of the cardigan, especially after seeing so many worn at a Harry Styles concert last year – yes, we have already seen Harry in concert once before!

Of course, with me as her mum, she wanted to crochet her cardigan rather than knit one! 😉Although I provided a little guidance here and there, it was Bronwyn herself who created this version entirely – she was 16 at the time. ❤️

We based ours on the knitting pattern mentioned above which was written by Ruth Herring. Do go and have a look at it: https://www.jwanderson.com/gb/cardigan-pattern Although it’s knitted and not crocheted there’s lots of helpful informaton about construction and it’s just really nice to go and have a look at it. And of course if any of you are knitters, then you might prefer to knit one and if so then this is the cardigan to make!!
We love how the squares are actually made in long panels – looking at the cardigan you might assume that they’re individual squares joined, but they’re not!


Bronwyn did absolutely brilliantly! Sweet little Salty was still with us when she was making it… ❤️

I love Bronwyn’s crocheted version so much and she proudly wore it to Yarndale last year…


There were other Harry Styles inspired cardigans spotted at Yarndale too!

And she wore it again at the Spinning Yarns Festival in Northern Ireland….


So let me share how Bronwyn created her cardigan. This is more like a guide than an actual pattern. This is of course not our design – it is fully inspired by the original JW Anderson cardigan which Harry Styles wore (although we thought carefully about how to do a crocheted version and chose a variety of stitch patterns). We’re sharing this here to continue the essence of sharing and caring which this cardigan encouraged amongst makers everywhere…❤️
What Bronwyn used:

Bronwyn used Cygnet Yarns Chunky which we felt had the best colour match to the original cardigan… ❤️💚💛🧡🖤 Being a chunky yarn it also crochets up super quick! You can of course use different yarn types but if using a thinner DK weight yarn you’ll need to add more stitches and rows to each square to get to the same size.
Here’s what Bronwyn used:
Cygnet Chunky
3 balls each of Red (167) and Black (217),
2 balls each of Orange (632), Emerald (377) and Citrus (145)
1 ball of Turquoise (365)
Cygnet Aran
1 ball of Red (1206) in Aran for the cuffs, neck edging and bottom edging.
Bronwyn used a 7mm crochet hook and an 8mm Tunisian hook for the green squares but your tension might be different. Choose a hook size to suit your own yarn and tension.
Measurements:
Bronwyn’s cardigan when laid out flat measures 24 inches / 61 cm across the chest from armpit to armpit. It’s a large easy fitting cardigan but for even larger sizes you can simply make your squares bigger by doing more stitches and rows in each square.

How Bronwyn created her cardigan:
Bronwyn did some lovely planning sketches in a notebook prior to starting, carefully working out how many different squares she would like, which stitch patterns she would use and what colour orders to do…

Bronwyn wanted this crocheted version to be like the knitted one as much as possible so she chose stitches based on different techniques to create different textures.

What you see above is basically Bronwyn’s very rough pattern and how she went about creating her cardigan. She didn’t use anything else. This one page made complete sense to her! 😄
Bronwyn’s version has a back panel and two front panels. The back panel has 4 squares across and 4 squares in height. Because the squares are actually made in long strips, there were four strips to make in total for the back. Each front panel had two strips.


The sleeves were made of 3 strips with 3 squares in each strip.

Here are the stitch patterns Bronwyn used for each square:
Bronwyn adjusted the stitch count for each square because some squares came out naturally bigger than others due to the variety of different stitches used.
Where the squares have a different number of stitches simply make sure that when joining the next colour and beginning your next square on top of the previous square you make sure you crochet the correct number of stitches needed for this next square. You might need to increase by doing 2 stitches in the same place somewhere across the row or decrease by missing a stitch or two.
When making your cardigan you can be flexible! Check your squares – would they benefit from having more or less stitches across? And maybe you’ll need to do more or less rows to make your squares actually square! We’re just sharing what Bronwyn did and it’s only a guide – I encourage you to do it your way and make changes as needed. You want your strips to be as straight as possible.
This is a very forgiving project and its fun to approach it in a relaxed, anything goes kind of way!
Black Square
This is a simple square of double crochet (US single crochet) stitches with 21 stitches across and 20 rows.
If you’re starting with this square as the first in your strip begin with 22 chains and make your first stitch into the second chain from the hook.
Each row begins with 1 chain which doesn’t count as a stitch.

Orange Square
This square is 21 stitches across and 13 rows. Start with a simple row of treble (US dc) stitches, then to create the texture continue with alternating rows of Back Post treble stitches (US BPdc) and then the next row in Front Post treble stitches (US FPdc) and so on.
Each row begins with 2 chains (which count as the first stitch of the row) and ends with a half treble (US hdc) in the final stitch. This is because Raised stitches sit a little lower than traditional stitches and beginning and ending with the shorter stitch allows for this.
If you’re starting with this square as the first in your strip begin with 23 chains and make your first treble into the 4th chain from the hook (the missed 3 chains count as the first tr.

Red Square
This square is like a Linen Stitch with 21 stitches across and 21 rows. The stitch pattern in UK terms is below. A UK dc is a US single crochet.
Row 1: 1dc in first st, *1ch, miss next st, 1dc in next st, repeat from * to end, turn.
Row 2: 1ch, 1dc in first st, 1dc in next 1-ch-sp, *1ch, miss next st, 1dc in next 1-ch-sp, repeat from * to end, 1dc in final st, turn.
Row 3: 1dc in first st, *1ch, miss next st, 1dc in next 1-ch-sp, repeat from * to final ch-sp, 1ch, miss next st, 1dc in final st, turn.
Repeat rows 2 -3 for the pattern.
If you’re starting with this square as the first in your strip begin with 22 chains and make your first stitch into the 2nd chain from the hook and work a whole row of double crochet (US sc) stitches in the very first foundation row.

Green Square
This square is made using the technique of Tunisian Crochet.
It’s Tunisian purl stitch which really is a nod to capture the original knitted cardigan!
It’s 20 stitches across and 13 rows using an 8mm Tunisian crochet hook.
If you’re starting with this square as the first in your strip begin with 20 chains.
Foundation Row: Forward Pass: Insert hook under top strand of second ch from hook, yoh and pull up a loop leaving loop on hook, * insert hook into next ch, yoh and pull up a loop, repeat from * in each chain across (there should be 20 loops on the hook at the end).
Foundation Row: Return Pass: Yoh and pull through first loop on hook, *yoh and pull through 2 loops on
hook, repeat from * until 1 loop remains on hook.
Continue in Tunisian Purl Stitch for the rest of the rows.
If you don’t want to do Tunisian crochet you can choose any other textured stitch for this square. We loved how the Tunisian Purl stitch looked like knitting but was still crocheted (of course if you can knit you could always simply knit this square- remember, anything goes!)

Yellow
This square is made by alternating double crochet (US sc) stitches and treble (US dc) stitches across the row to create a lovely texture. This square came up bigger than the others so Bronwyn only had 18 sts across and 13 rows.
Bronwyn started with a row of 18 double crochet stitches.
Each row thereafter was made as follows:
1ch, 1dc in first st, 1tr in next st, *1dc in next st, 1tr in next st, repeat from * to end, turn.
If you’re starting with this square as the first in your strip begin with 19 chains and make your first stitch into the 2nd chain from the hook and work a whole row of double crochet (US sc) stitches.

Black and Red Square
This square is the most like one of the squares on the knitting pattern available on the JW Anderson website. Bronwyn used the same chart as in that pattern crocheting simple half treble (US half double crochet) stitches using the tapestry method of colour changing to bring the two colours across the row. On the colour chart each square represents 1 htr stitch. Read all Right Side rows from right to left, and Wrong Side rows from left to right. Bronwyn’s square had 18 sts across and 12 rows, repeating rows 1 – 5 of the chart for the second repeat.
If you’re starting with this square as the first in your strip begin with 19 chains in Red and make your first stitch into the 2nd chain from the hook.


How Bronwyn joined the Cardigan
Once all the strips were made Bronwyn joined them together. The two front panels were joined to the back panel at the shoulders. The three strips of each sleeve were all joined to create a tube. These were then joined to the shoulders before joining the side seams together below them.
Bronwyn joined the strips using a mattress stitch seam…

The thinner Red Aran weight yarn is used for the neck edging, cuffs and bottom edging.
Neck Edging:
A simple neck edging in 3 rows of double crochet (US sc) stitches was crocheted.

Cuffs were made in a ribbed pattern using the thinner red Aran weight yarn.
Begin by crocheting treble stitches evenly around each cuff ensuring you have an even number of stitches at the end. Then follow these two rounds:
Round 2: 2ch, 1BPtr around next st, *1FPtr around next st, 1BPtr around next st, repeat from * to end, ss to top of first 2 ch, turn.
Round 3: 2ch, 1FPtr around next st, *1BPtr around next st, 1FPtr around next st, repeat from * to end, ss to top of first 2 ch, turn.
Repeat these two rounds until the cuffs are the desired length. Bronwyn crocheted 2 more rounds.

A bottom edging was crocheted using the same ribbed stitch pattern as the cuffs. Begin by crocheting a row of double crochet (US single crochet) stitches across the whole bottom ensuring this time that you have an odd number of stitches at the end.
Then crochet a row of treble (US double crochet) stitches.
Then work these two rows:
Row 3: 2ch, (counts as first htr), 1FPtr around next st, *1BPtr around next st, 1FPtr around next st, repeat from * to final st, 1htr in final st, turn.
Row 4: 2ch, (counts as first htr), 1BPtr around next st, *1FPtr around next st, 1BPtr around next st, repeat from * to final st, 1htr in final st, turn.
Bronwyn repeated Rounds 3 – 4 once more but you can do more repeats as desired.

And finally a centre front edging was crocheted going all the way along both the centre front edges using the Turquoise colour. Bronwyn crocheted 4 rows on each side.
The first row was simple double crochet (US single crochet) stitches, The next three rows were half treble (US half double crochet) stitches.


And there you go… a little guide to help you crochet a JW Anderson Harry Styles inspired cardigan… I hope it was helpful!

Happy Crocheting Everyone… 😊❤️

She is as gorgeous and talented as her mama!
Awwww… thank you Robin! That has made us both smile… 🥰🕺🏿❤️
Love it. ❤️
Thank you! ❤️
Thank you, thank you! Your incredibly talented 16 year old has made my 14 year old Harry Styles fanatic oh so happy! Can you guess what we will be making over the summer……? ❤️
Amazing job by your daughter! She’s extremely talented like her mama!
I am going to have a go, my granddaughter is 16 and a Harry Styles fan. She attended his concert in Sydney. 🤞I can have it done by September. Thank you both for sharing.
LOVE this!
Not cold here in Brazil but I’m definitely making one! 😄
Thank you and your daughter who has inherited love for crochet. Thanks once again for sharing. I love and appreciate your generosity.
My grandson learning to crochet and I showed him this to try. Thank you for sharing all the details. We are going to share a fun project!!!!
Fabulous! 🥰❤️🧡💛💚
Love the cardigan…it’s going to be my next project. MayI ask what size approx are each of the squares?
Hi Susan, apologies for delay in replying. The squares are approximately 6 – 7 inches but don’t worry about getting this exact… it’s a very easy fitting cardigan!
Greetings from Janesville WI USA. I just recently, after Liam died, dove into the One Direction rabbit hole. I have discovered their music and personalities and then came across your instructions for this sweater. I only have the bottom and center trim to finish. I’m so proud of myself, but couldn’t have done it without these instructions! Thank you so much.😊
I’m really glad to hear they helped you create your own cardigan! ❤️