


About a month ago I found a little piece of driftwood on the beach that looked very much like the hull of a boat!
 I picked it up, brought it home and of course I crocheted a little sail for it! 🙂 This was such a spontaneous, quick and simple project but so effective and it now hangs on a little bit of wall space in our kitchen…
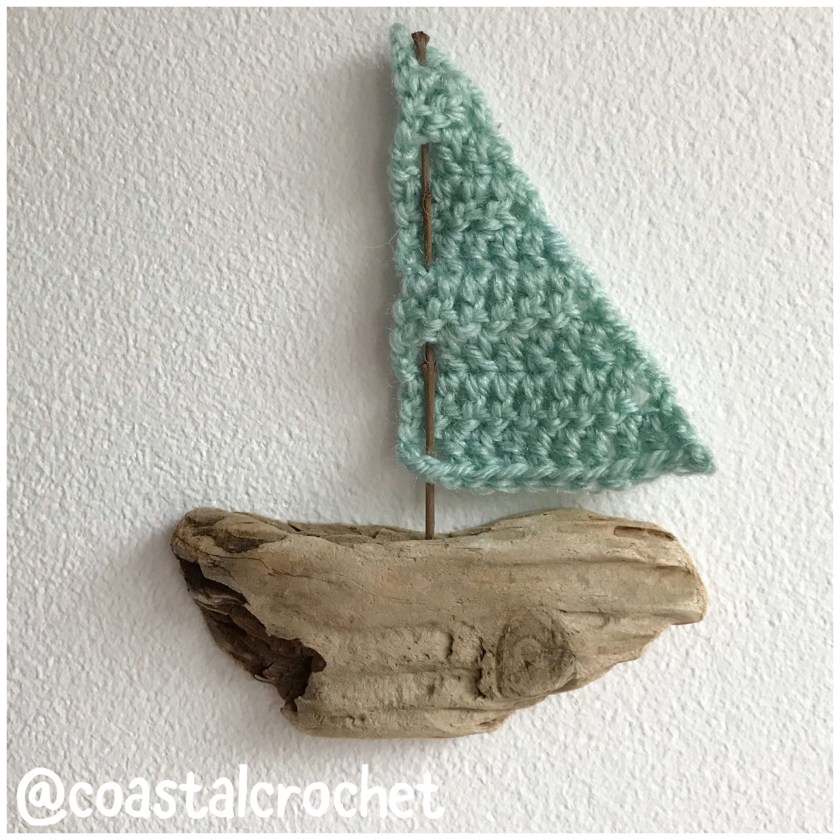 I posted this photo on my Instagram account and it was a really popular photo! Proof that you really don’t need elaborate or complicated creations to inspire people and inject a little creativity…simple is so often best!
I have since found another piece of driftwood…
 As you can see it’s very small at only 6cm across. So to make a sail for this I used some thin cotton thread and a 1.75mm hook…
 You can see the size difference between the two boats here…

Some people have asked me for the pattern of the sail so they too can create a coastal inspired decoration.
So here it is…
Crochet Sail (or just a right angled triangle!)

This pattern is for a simple right angled triangle which I have used as a simple sail to add to boat shaped pieces of driftwood for a very simple yet very effective coastal inspired decoration!
Materials: Any yarn with appropriately sized hook (for the sea green sail I used an acrylic DK yarn with a 3.50mm hook, for the orange sail I used Rico Essentials Crochet cotton thread and a 1.75mm hook), scissors and yarn needle.
To make the sail boat you will also need a piece of driftwood, a small stick and some super glue.
Abbreviations: ch: chain, mm: millimetres, st(s): stitch(es), tch: turning chain, tr: treble.
Pattern Notes: The triangle is crocheted in treble (US double) crochet stitches – UK crochet terminology is used. It is crocheted from the point of the triangle and increases are made every row on one side only. The triangle can therefore be made as wide as needed – just continue increasing as indicated until the desired length and width is reached. The turning chains count as a stitch.
To Work:
Make 3ch
Row 1 1tr in 3rd ch from hook, 3ch (counts as 1st st of next row here and throughout), turn (2 sts)
Row 2 1tr in st at base of tch (increase made), 1tr in final st, 3ch, turn (3 sts)
Row 3 1tr in next st, 2tr in final st (increase made), 3ch, turn (4 sts)
Row 4 1tr in st at base of tch, 1tr in each st to end, 3ch, turn
Row 5 1tr in next st and each st to final st, 2tr in final st, 3ch, turn
Repeat Rows 4 and 5 until 9 rows have been worked. Of course you can make less rows if you want a smaller triangle or continue repeating rows 4 and 5 until desired length and width is reached.
To make the sail boat I found a very thin stick from the garden for the mast. I put the sail onto this mast as shown in the photos and then made a tiny hole using a nail or screw in the driftwood where I wanted the mast to go into. I put a small amount of glue into this hole and inserted the mast holding it in position until the glue dried.
And there you have it…a little driftwood sailing boat complete with crocheted sail!
Enjoy… 🙂 🙂


That’s such a sweet idea, thanks for sharing. I will keep that in mind for the next walk in the woods (no beaches arround here…)
Thank you Susi… I’m so glad you like it! Enjoy searching for the right little pieces of wood! 🙂 🙂
Reblogged this on Yarnsage.
Thank you! 😊
Cute!
Thanks Sandra! 😊❤️
Goes to show how sometimes the simpler things work best. I tend to over complicate things on occasion then something simple is gets more attention. Go figure 🙂
Absolutely Yolanda… I have to remind myself of this too sometimes! Keep it simple! 😊😊
These are so simple but so cute. Thank you for sharing. I love driftwood and its nice to have an idea of something reasonably easy to make with it
You’re very welcome Julia… finding the right shaped driftwood is the hardest part of this project!! Good luck… 😊😊
The search is part of the fun! Though I don’t live near a beach… I’ll have to wait till my next holiday by the sea!
Ha ha! Yes, absolutely… that mission to find a piece of suitable wood! These two just jumped out at me, I was lucky! 😊😊
It’s like that with the search for sea glass too. I guess it wouldn’t be so satisfying if it was too easy!
Simple and utterly charming.
Awww, thanks so much Cathy…❤️😊😊
Ah great! I have been wanting to do this since I saw your last post. Thanks for pattern!
You’re very welcome…enjoy! 😊😊
These are cute, thanks for sharing.
Thank you and you’re very welcome ! 😊😊❤️
Aww I bet they look fab on your walll, very creative!
Thank you Liz! 😊😊
Love these, they’re so cute!
Thank you so much! So glad you like them…😊❤️
So cute! Sometimes simple is best.
Thank you so much Robin… yes I agree! 😊❤️❤️
I love the dinky new one! They look fab together 🙂
Awww, thanks Hannah-it really is very dinky! 😊❤️
It´s looks very nice.
Thank you! 🥰🍄